Saturday, February 21, 2015

How to stream music to your network enabled AVR using Foobar2000?


There are many ways to stream the music on your computer to your receiver.
If you are using Windows, you can use Windows Media Player to stream music to your network enabled AVR. Why do you want to do this?
The sound produced from your home theater is a lot better than the sound coming out from your laptop or computer speakers.

Here I will show you how to use Foobar2000 to stream music to your network enabled receiver.

1. Download Foobar2000

2.Download and install the plugin or UnPn component from the same website


3. Turn on your network enabled receiver. Make sure it is connected to your local network.

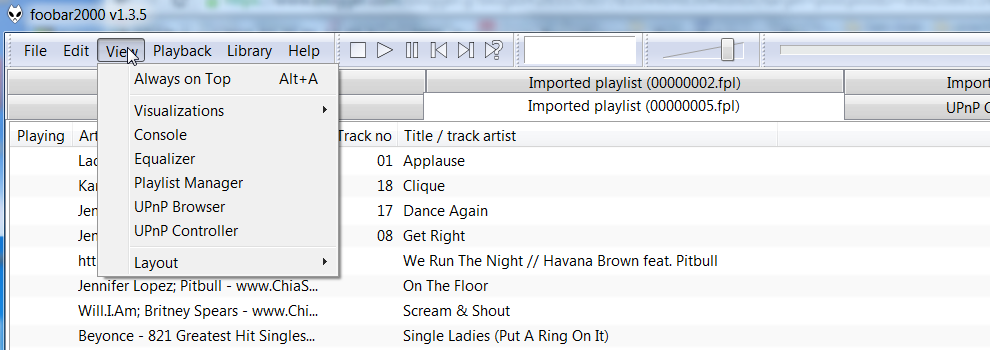
4.  Run Foobar2000! You should see the UPnP controller menu item if everything is installed correctly.


5. Select the UPnP controller menu item to launch the UPnP controller dialog.
From this dialog, you can select a variety of devices available on your network that you can stream
your music to. Here I have two devices, and I will select my Denon AVR receiver.
Notice the program will detect the devices for you automatically. You just need to make sure they are on and connected to your local network.


6. Select the device you want to stream and click on the play button. When you click the play button, it will play the music on your current play list so make sure your playlist is not empty.

Friday, January 2, 2015

How to stream live feed from your security camera to your smart phone?

In order to stream live content from your security camera to your smart phone, you need to know your IP address, the model of your camera, and configure your router to allow you to access your camera remotely.
I am assuming that you have basic networking knowledge and have everything working already so I will only talk about configuring your router so that you can access your camera remotely.

Each camera you have will have a unique internal IP address assigned to it.
Since it is an internal IP address, most IP address will start with 192.168.*.*.

You cannot access the camera from the internet  using these internal IP addresses.
These IP addresses are valid only from within your private wireless or wire network.

In order to access your camera from the outside, you need to access the IP address assigned to your cable modem by your internet service provider.
Assuming that this IP address is 24.145.239.234, you will  have to access all your cameras inside your network using this IP address. Even though you access all the cameras using the same IP address, the port number will be different for each camera.

The first thing you need to do is to assign a static IP address for each camera inside your network. This will prevent the IP address of the camera from changing when you reboot the device or the router. Here is an example on how it would look like:


If you have Netgear router, then you can just go the same place shown in the screenshot to assign static IP address to your device. If you have a different router, you can go to similar pages or settings.

Once you have assigned static IP addresses to your devices, you will need to assign a unique external port number to each device. Remember we have to access all the devices using the same unique IP address assigned to you from your ISP; therefore, the only way to distinguish each device is through the port number you assigned to each device. This is concept is called port forwarding.


As you can see from the above screenshot, the port numbers listed in the external start port column are the ones we will use to associate with each camera inside our internal network from the outside. Please check the relationship between this screenshot and the one above it.
After you have done all the steps correctly, you should be able to access one of your camera from the browser via this URL:

http://24.145.239.234:8000

What happens is the request will come to your router first, then it will forward the request using the port number to the appropriate camera inside your network. Notice the external port number is associated with an internal IP address.

You are set. Now the same information can be used to configure a smart phone app so that you can view live content of your camera from any smartphones.
IP Cam Viewer is an IOS app that you can use for iPhone. Similar Android apps can be found for your Android devices as well.

Friday, November 14, 2014

How to create and use your own custom compare method for STL classes?


As you may have known, the STL libraries provide you with a vast collection of classes and algorithms that you can use in your program.
Some of the most popular data structure classes that you may have known are vector and set.
In this articular article, I will talk about both with examples.

STL::set<YourClass>   variable;

Typically this would be your declaration for a set. Notice a set always have unique elements in it that's why sorting is required to help determine if a new element is already existed in the set. Therefore, the elements are already sorted in some default order. The next question is what if you don't like the default sorting.  Let's say you want to sort by the typeID of the object.
If this is the case, you will have to create  you own compare method:

STL::set<YourClass, CompareMethod> variable;

Let's say your class name is Object and the compare method is call SortByType.

STL::set<Object, SortByType> variable;

You would declare your compare method like this:

struct SortByType
{
bool operator()(const Object & object1, const Object & object2)
{
return (object1->GetInterfaceMetaClass()->GetTypeID() > object2->GetInterfaceMetaClass()->GetTypeID());
}
};


Now you can copy the content from the set with default sorting to the your new set:

SLT::set<Object> originalSet;

STL::set<Object, SortByType> newSet(originalSet.begin(), originalSet.end());


If you want to copy to a vector, then you can insert and then sort your vector.

bool SortByType(const RefARpObject & object1, const RefARpObject & object2)
{
return (object1->GetInterfaceMetaClass()->GetTypeID() > object2->GetInterfaceMetaClass()->GetTypeID());
}

STL::vector<Object> vect;
vect.insert(originalSet.begin(), originalSet.end());

STL::sort(vect.begin(), vect.end(), SortByType);

Notice the declaration for SortByType used in the set template are different than the one used by the
sort algorithm.


Friday, October 24, 2014

Linux commands equivalent to Windows start command

In Windows DOS prompt console, you can use the start program to do a lot of things. Here are just a few examples:
>start .   -- open the current folder. Notice this is very helpful if your path is very long. It saves you a lot of time having to traverse to the folder you want manually.
>start http://yahoo.com   -- open yahoo website
>start c:\temp  --- open the Windows dialog with the c:\temp folder opened.


Now, how do we do this in Linux?

If you are using Gnome desktop manager, then you can run this. How do you know you are using a Gnome desktop manager? You can run >pstree and look for gnome keywords. If you do see one, you are probably using a Gnome desktop manager.

>gnome-open .
>gnome-open http://yahoo.com
>gnome-open c:\temp


A generic way to do this is to run xdg-open, but this script is not always installed.

>xdg-open .
>xdg-open http://yahoo.com
>xdg-open c:\temp


Friday, May 16, 2014

How to debug unknown exception in AIX system using dbx?

dbx is the equivalent of gdb debugger in Linux.
Let's assume you have an issue with an application which terminates with an exception in the AIX system.
You don't know where this exception is thrown in the code and the exception message is not very clear to you. The first thing to you need to know is where this exception gets thrown in the code so you can fix the issue. Here is the trick:

>dbx  myprogram

(dbx) stop in __ThrowV6  //break at any exception, __ThrowV6 is the exception handler. All exceptions will go to this exception handler. If you stop here and view the stack you will know exactly where the exception is being thrown.
(dbx) r -c arguments   //run the program with specific arguments


This trick above is handy if you don't know where to set a break point in the program since the exception can be thrown in many places in the code. Some code does handle the exception, but it would just print out a generic message which is useless. It is a good idea to handle the exception and print out the real message.

#include <exception>
using namespace std;
try
{
....
}
catch(exceptio& e)
{
cout << e.what() << endl; //this will print out the actually error causing the exception.
}

Thursday, May 15, 2014

How to share/access Linux folder from Windows machine?

Samba is a service that would allow you to share your Linux folder so that you can access it on your Windows machines.
Here is a quick tutorial on how to do it.

1) first you need to check if the samba server is running or not
/sbin/service --status-all  | grep smb

If it is not running yet, try to start it

sudo /sbin/service smb start or sudo /sbin/service smbd\\\\ 

If samba is not installed, install it: sudo apt-get install samba
    
2) second check if this shared definition exists in your smb.conf file

[homes]
         comment = Home Directories
         browseable = no
         writable = yes
         valid users = %S

In order to access the symlinks in your samba share, you need to add the followings to your global section:

[global]

follow symlinks = yes
wide links = yes
unix extensions = no

If the above does not exist in the smb.conf file, add them to the file

sudo emacs -nw  /etc/samba/smb.conf

Your home directory should be shared by default.

Once you have finished modifying the file, restart the samba service

sudo /sbin/service smb restart

3) If you still cannot access the shared in Windows, check and make sure the user is already in the samba database.
It will prompt for the password, it is good to use the same password you used to log into windows.

sudo smbpasswd -a nquach

Once you have everything setup, you can access your linux share on Windows by using this path.

\\linuxmachine\username or \\LinuxHostName\nquach

If you ever change your password for your signon, you need to change the samba password again to match the new password.

Cheers

Monday, May 12, 2014

How to profile your code using valgrind?


There are various ways that you can profile the code. I will talk about Callgrind and Massif. You can get a lot more information from these two profilers, but I will just mention about my purposes for using them.
Use Callgrind to find out which methods get called the most, and use Massif to find out which methods use the most memory.

Callgrind records the call history and the program's calls graph. Here I am using it to find which methods get called the most.

Example:
>valgrind --tool=callgrind  --callgrind-out-file=callgrind_prof.out validaterpd -s -o consichk.txt -r coreapplication_OH452963239_v326.rpd -pAdmin123

Use kcachegrind to view the output from callgrind.

>kcachegrind callgrind_prof.out


Massif is a heap profiler. Here I am using it to find out the peak memory usage of my program.
I can also find out which method uses the most memory as well.
For details on now to interpret the results of your profile, please check this page

http://valgrind.org/docs/manual/ms-manual.html


Occasionally you may running into issues where valgrind fails to run complaining about the
VG_N_SEGMENTS segment being too low.

If you run into this error, you need to change the default value and recompile valgrind.
You can search for the cpp file defining this  VG_N_SEGMENTS value and change it.
For example, I have changed it from 30000 to 90000.


Example:

>valgrind --depth=200 --tool=massif  --massif-out-file=main_mem_prof.out validaterpd -s -o consichk.txt -r coreapplication_OH452963239_v326.rpd -pAdmin123

>ms_print main_mem_prof.out > main_depth200.txt


From the screenshot, you can tell that the peak is at snapshot 4 and the peak memory usage is around 4.2GB.