What you need to have?
1. WIFI or internet enabled TV. This TV must be connected to you local network.
2. Install VLC media player and Serviio media server on your computer. You can Google for these programs. They are free programs.
Standard frame or field rates
ATSC table 3 defines the following frame rates for digital high-definition television.[23]
23.976 Hz (film-looking frame rate compatible with NTSC clock speed standards)
24 Hz (international film and ATSC high-definition material)
25 Hz (PAL, SECAM film, standard-definition, and high-definition material)
29.97 HZ (NTSC standard-definition material)
59.94 HZ (ATSC high-definition material)
60 Hz (ATSC high-definition material)
The optimum format for a broadcast depends upon the type of videographic recording medium used and the image's characteristics. For best fidelity to the source the transmitted field ratio, lines, and frame rate should match those of the source.
Although PAL, SECAM and NTSC frame rates technically apply only to standard definition television, not HD, with the roll out of HD, countries maintained the heritage of their former systems. HDTV in former PAL countries operates at a frame rate of 50 Hz and HDTV in former NTSC countries operates at 60 Hz.[24]
Use the information above as a reference to tell VLC what frame rate to use.
Higher rate will have better quality and require more computing resources. This information will make more sense once you have looked at the sample batch file I have created below. If you looked at it, you will see that I stream the desktop at 24 frames per second. You can tweak this number around depending on the computing power of your computer.
After you have installed the VLC media player, you need to install the following components to help capture and send both audio and desktop screenshots to your TV in real time.
1. install the screen capturer recorder
2. install virtual-audio-capturer as well if it is not installed
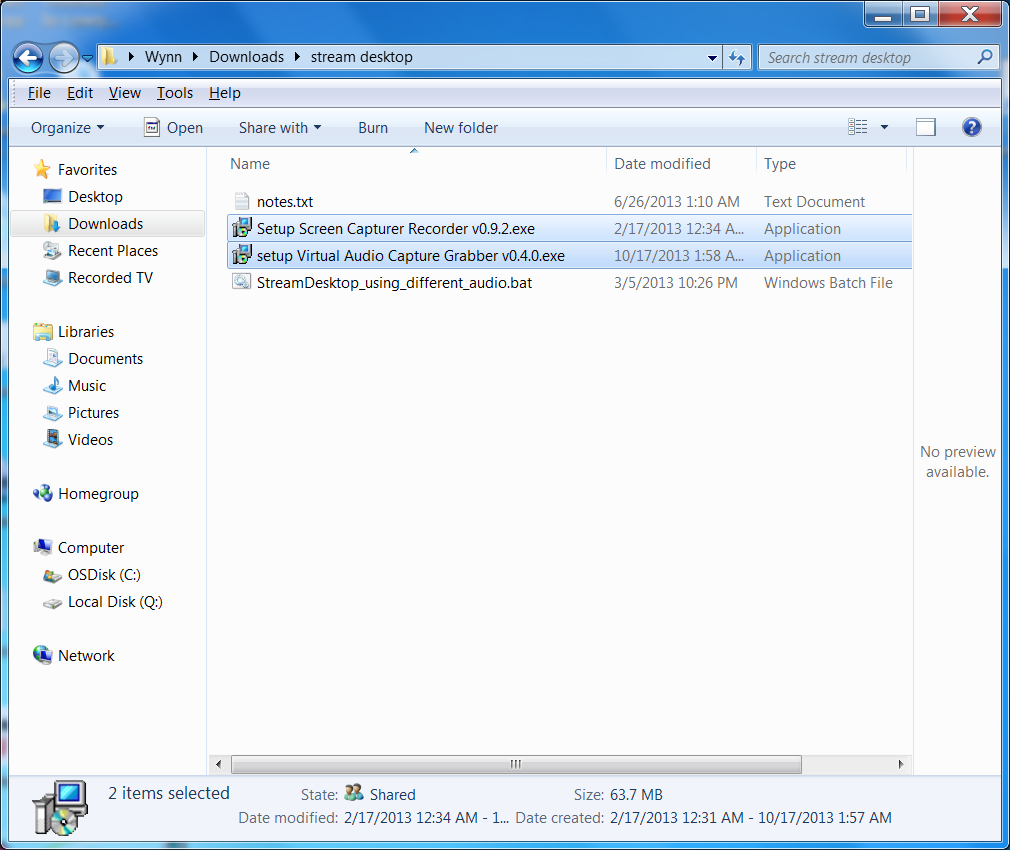
3. Create a batch file using the sample batch content mentioned below.
This batch file will launch the VLC program with the appropriate parameters to stream your desktop to your TV.
4. After running the batch file created in previous step, paste the HTTP address of your computer to the Serviio media server under the online sources tab. Notice you have to use the ip address of the local machine in order for the DLNA devices on your network to see the online source. Running the batch file should launch VLC program. Notice the port number has to be the same as the one you specified in the patch file.


How does all of this work? In summary, your TV is actually connecting to the Serviio media server, and the content streamed to your TV is created by the VLC media player in conjunction with the related components mentioned above. How does your TV connect to the Serviio media server? If you have setup correctly, your TV should be able to detect the media server in your local network. There should be an option to connect to a media server in your TV settings.
Batch File:
Copy the content below the dash line to a batch file.
This bat is used to stream the desktop with VLC using HTTP.
A corresponding player must be started using HTTP.
Use Serviio to stream the content of your desktop to your TV. Most players will recognize Serviio as a media server.
In the example below, VLC will capture and stream the desktop at port 8081. You need to put this url localhost:8081 as online stream source in your Serviio setting. Once you have setup your Serviio media server, you can run this batch file to stream the desktop content.
Notice in the batch, I have various samples. One of the differences is the height and width of the image sent to the TV. You may want to adjust these two settings to match the size of your TV.
---------------------------
@echo off
"C:\Program Files (x86)\VideoLAN\VLC\vlc.exe" -vvv dshow:// --sout=#transcode{venc=ffmpeg,vcodec=mp2v,vb=10000,fps=24,scale=0.5,width=1280,acodec=mp3,ab=192,channels=2,samplerate=44100}:std{access=http,mux=ts,dst=:8081} --no-sout-rtp-sap --no-sout-standard-sap --ttl=1 --sout-keep :dshow-vdev=screen-capture-recorder :dshow-adev="virtual-audio-capturer" :dshow-caching=2000
REM "C:\Program Files (x86)\VideoLAN\VLC\vlc.exe" -vvv dshow:// --sout=#transcode{venc=ffmpeg,vcodec=mp2v,vb=10000,fps=24,width=1366,height=768,acodec=mp3,ab=192,channels=2,samplerate=44100}:std{access=http,mux=ts,dst=:8081} --no-sout-rtp-sap --no-sout-standard-sap --ttl=1 --sout-keep :dshow-vdev=screen-capture-recorder :dshow-adev="virtual-audio-capturer" :dshow-caching=2000
REM "C:\Program Files (x86)\VideoLAN\VLC\vlc.exe" -vvv dshow:// --sout=#transcode{venc=ffmpeg,vcodec=mp2v,vb=10000,fps=30,width=1440,height=960,acodec=mp3,ab=192,channels=2,samplerate=44100}:std{access=http,mux=ts,dst=:8081} --no-sout-rtp-sap --no-sout-standard-sap --ttl=1 --sout-keep :dshow-vdev=screen-capture-recorder :dshow-adev="virtual-audio-capturer" :dshow-caching=1000
REM "C:\Program Files (x86)\VideoLAN\VLC\vlc.exe" -vvv dshow:// --sout=#transcode{venc=ffmpeg,vcodec=mp2v,vb=10000,fps=30,width=1660,height=900,acodec=mp3,ab=192,channels=2,samplerate=44100}:std{access=http,mux=ts,dst=:8081} --no-sout-rtp-sap --no-sout-standard-sap --ttl=1 --sout-keep :dshow-vdev=screen-capture-recorder :dshow-adev="virtual-audio-capturer" :dshow-caching=100
REM "C:\Program Files (x86)\VideoLAN\VLC\vlc.exe" -vvv dshow:// --sout=#transcode{venc=ffmpeg,vcodec=mp2v,vb=10000,fps=30,width=1600,height=900,acodec=mp3,ab=192,channels=2,samplerate=44100}:std{access=http,mux=ts,dst=:8081} --no-sout-rtp-sap --no-sout-standard-sap --ttl=1 --sout-keep :dshow-vdev=screen-capture-recorder :dshow-adev="virtual-audio-capturer" :dshow-caching=100
REM "C:\Program Files (x86)\VideoLAN\VLC\vlc.exe" -vvv dshow:// --sout=#transcode{venc=ffmpeg,vcodec=mp2v,vb=10000,fps=30,width=1680,height=1050,acodec=mp3,ab=192,channels=2,samplerate=44100}:std{access=http,mux=ts,dst=:8081} --no-sout-rtp-sap --no-sout-standard-sap --ttl=1 --sout-keep :dshow-vdev=screen-capture-recorder :dshow-adev="virtual-audio-capturer" :dshow-caching=100
REM NOT WORKING
REM "C:\Program Files (x86)\VideoLAN\VLC\vlc.exe" -vvv dshow:// --sout=#transcode{venc=ffmpeg,vcodec=mp2v,vb=10000,fps=30,width=1600,height=1200,acodec=mp3,ab=192,channels=2,samplerate=44100}:std{access=http,mux=ts,dst=:8081} --no-sout-rtp-sap --no-sout-standard-sap --ttl=1 --sout-keep :dshow-vdev=screen-capture-recorder :dshow-adev="virtual-audio-capturer" :dshow-caching=100
REM Best resolution for my Sony TV
REM 1) "C:\Program Files (x86)\VideoLAN\VLC\vlc.exe" -vvv dshow:// --sout=#transcode{venc=ffmpeg,vcodec=mp2v,vb=10000,fps=30,width=1440,height=1080,acodec=mp3,ab=192,channels=2,samplerate=44100}:std{access=http,mux=ts,dst=:8081} --no-sout-rtp-sap --no-sout-standard-sap --ttl=1 --sout-keep :dshow-vdev=screen-capture-recorder :dshow-adev="virtual-audio-capturer" :dshow-caching=100
REM 2) "C:\Program Files (x86)\VideoLAN\VLC\vlc.exe" -vvv dshow:// --sout=#transcode{venc=ffmpeg,vcodec=mp2v,vb=10000,fps=30,width=1440,height=960,acodec=mp3,ab=192,channels=2,samplerate=44100}:std{access=http,mux=ts,dst=:8081} --no-sout-rtp-sap --no-sout-standard-sap --ttl=1 --sout-keep :dshow-vdev=screen-capture-recorder :dshow-adev="virtual-audio-capturer" :dshow-caching=100
:Exit
No comments:
Post a Comment